
Painting and artwork are what heals the soul. Since time immemorial, men have been drawn to the wonders of nature and the skies. Men have tried to recreate the stars and the moon, the night sky, and the auroras with colors and paper! So, if galaxy art attracts you, I understand how and why!
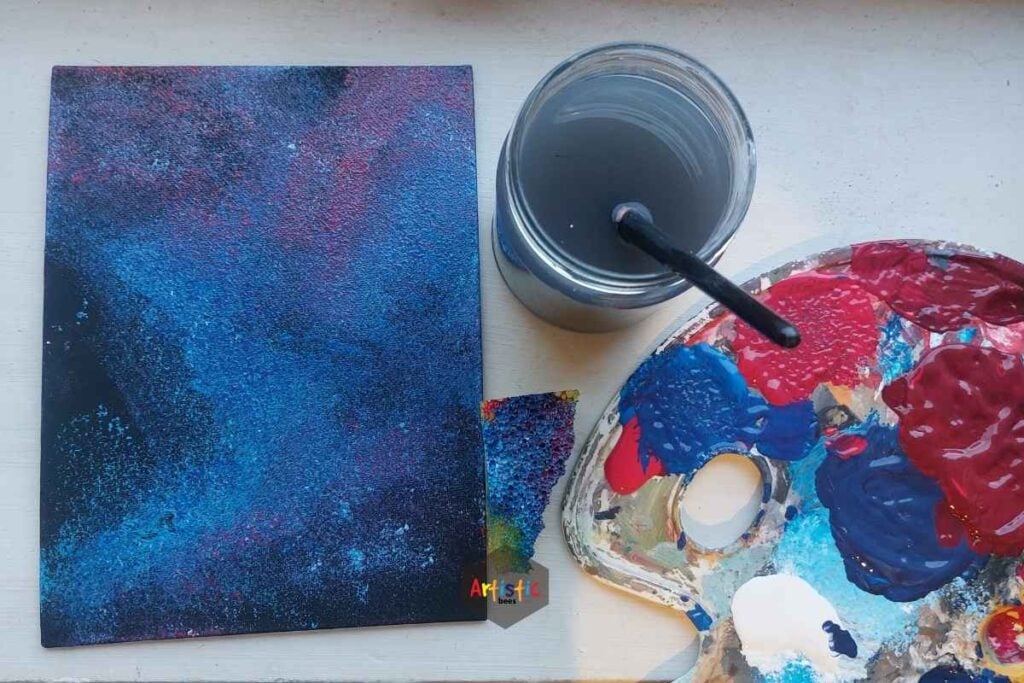
To paint a galaxy, you need just the primary colors and a whole lot of white color! Make a dark background first, or choose multiple dark shades to make your background. Then, with a brush or a sponge, dab on the other colors and blend as you like.

So, if you are a noob at art, you need a complete guide on how to paint a galaxy. In this article, I shall discuss the best colors you can use for such artworks, the dos and don’ts of galaxy art, and what alternative equipment you can use for your artwork. So, to enlighten your minds, please read the entire article.
Painting A Galaxy In Ten Minutes: For Beginners
As far as the world of art is concerned, galaxy art is the simplest and the most effortless painting you can do in minutes! Although, at first sight, the artwork may look tricky, anyone with no prior experience with painting or blending can create a galaxy masterpiece on the first try!
Painting a galaxy means portraying the mixture of all colors on canvas. From a light-year away, what our eyes see is the playful mixture of hues all over the sky.
The magical stars and the light they disperse create a magnificent view of the galaxy. The colors we usually use in galaxy art indicate the different dispersion of light from these divine bodies.
Why Should You Learn To Paint A Galaxy?
The planets, the stars, the moon, the sun, the asteroids all constitute the galaxy. For someone who has a soft corner for the wonders of space, painting galaxies can be your thing! Gradually, a time comes when you feel so accomplished that you can finish painting a galaxy in just 5 minutes!
Actually, if you want to be a self-taught artist, thousands of videos on the internet can help you with that. So far, for basic skill development, the easiest blending technique that you can learn is by practicing galaxy arts.
The simplest galaxy arts constitute just the night sky with millions and trillions of stars. However, you can also add planets, asteroids, etc., to your galaxies. In addition, you can do it by cutting out different shapes of paper or on different shapes of canvases to create a more aesthetic look.
Once you master the art of the galaxy, blending colors will be your cup of tea. The techniques used here are very fine and meticulously done. But if you get the hang of the basics once, it won’t be a big deal for you in the long run!
Steps Of Painting A Galaxy In Ten Minutes
Firstly, you need to know the prerequisites for galaxy art. The best color media for painting a galaxy is watercolor. But you can also use acrylic or gouache paint. That is entirely your choice, whichever media you’re comfortable working with.
Now, about the tools, you will need. To be honest, you can make a galaxy with all the available things within your arm’s reach. There is no need to buy too expensive stuff or colors.
For a small scale artwork, you will require:
- A medium-sized canva or a canvas paper, about 260 to 300 GSM (Grams Per Square Meter)
- A sponge or paint brushes
- The basic colors, such as – Mars Black or Ivory Black, Dark mauve, Cobalt Blue, Prussian Blue, Carmine Red, etc., are enough!
- A whole damn lot of white color!
- A toothbrush or bigger paintbrush to sprinkle colors!
- An exemplary model of a galaxy that you want to recreate
- A pair of scissors, if you are cutting shapes.
So, after you have collected all the necessities, it’s time to get to the main artwork! So, continue reading the next part to know each step in detail!
Step One: Paint A Dark Background

So, the first thing you need to do is get your canvas or your art paper, whatever you are using. It is better to use papers with 250 plus GSM. They are thicker and can absorb a lot of paint on their surfaces. Or you can use handmade papers, whatever you find comfortable to work with.
Now, use a flat brush of large size to paint your whole canvas black. You can use Ivory black or Mars black. Both are the darkest shades of black you can find. If you are using acrylics, often, a single coat is enough to set on your paper. Acrylics dry off quickly as well. But if you are using watercolors, you need to wait for some time before you apply a second coat.
For watercolors, let the first layer dry beforehand. When it dries off completely, even if you rub your finger on the paper, your finger won’t be stained. So, check when it has dried, and then apply the second coat. The background should be completely black; Because this will help show off the blending of other colors perfectly.
However, the background does not necessarily have to be black always. It can also be a darker shade of Ultramarine Blue or Burnt Sienna. If you want to add planets, I think black is the best option to choose. Moreover, there are black canvases as well that you can buy now. But it won’t be a wise choice to use them for galaxy art.

Step Two: Take A Round Brush Or A Sponge And Start!
Now, the commonly practiced technique is to use a sponge and dab on different colors on the paper until they blend nicely. On the other hand, if you don’t have a proper sponge or don’t want to use one, you can use regular round brushes.
In the case of round brushes, the technique is a little different. Instead of dabbing colors, you put drops of colors and let the colors mix by themselves. Just put tiny, tiny blobs scattered on the whole paper or canvas. The surface tension of the liquid paint will help it to spread through the entire paper.
On the contrary, just take some paint on a color mixing tray if you are using a sponge. Then, dab a corner of the sponge on it. After that, in a diagonal fashion, start from one corner of the paper or canvas and make an oblique pattern.
It would be best if you made the first stroke with magenta pink or mauve. Or, you can also start with Cerulean Blue.
Make a darker layer first. Then slowly blend away to make it even. Then try to apply some white paint over it. It will make the colors a bit lighter and create two different gradients. Slowly, keep on blending the colors.
If you are using a round brush, this step will take some time. Because after you apply a layer, you have to wait for some time for the blobs to dissolve and to spread over. So, take a big round brush, about the size of 8 or 9, and put blobs of paint. Wait for the colors to splatter. In this way, make a diagonal-shaped pattern.
Step Three: Make More Diagonal Patterns
Now, using the sponge, take other colors that you want to portray in your galaxy. Actually, this is entirely your choice what colors you want on your canvas. Usually, a combination of blue, pink, and yellow looks excellent for galaxies. But you can use any color as per your choice. The beauty of your art will depend on how well you blend the colors.
So, in the next step, dip your sponge in other paints. Now, take some Cerulean Blue and dab it from another side, making another diagonal pattern. Or you can just dab it wherever you want, in a scattered manner. In the same way, take some rose pink or warm pink or some mauve paint. And in the same manner, make more diagonal patterns.
After you make the base, put some white paint over it. The application of white paint gradually will create multiple gradients. The colors should look like they are dispersing from a lighter center and slowly fading away towards the periphery.
It will allow the shades to stand out against the black background. Keep on mixing white and then add the base colors again. At one point, you can see areas of multiple gradients altogether.
Step Four: Add Black To The Canvas
Now, it is the most crucial yet tricky step. It is critical because the beauty and precision of your blending will depend on how carefully you complete this step. If you take too much color, chances are your galaxy will look mediocre. Let your colors dry completely. After that, it’s time to add black!
Now, take some black paint on your sponge or brush. If you are using a brush, put some black paint blobs on the areas you want to blend. Actually, the black color is used here to make the outlines of your diagonal patterns look more realistic. It creates the illusion that the colors have emerged from the darkness of the background!
On the other hand, if you are using a sponge, it is much easier. Take some black paint and keep on dabbing along the margins of the diagonal patterns. Do not let your sponge go too far beyond the margins to the center. Otherwise, the entire canvas will become black.
Slowly and gradually, keep on dabbing black paint along the edges. In the end, you will see how realistic the galaxy looks! Just be careful so that you don’t paint in the middle of your patterns.
Step Five: Add An Extra Layer Of Aqua Green
This step is totally optional. If you want, or say, if you don’t have this color, you can totally skip this step. What you need here is some Aqua Green paint. It is a shade nearer to ocean blue. So, just take your sponge again and dab on some aqua green in the empty spaces of your canvas. Or simply add blobs of aqua green using an eight-sized brush.
Let the aqua green spread over your canvas. After you make the base, use some white over it. Let the colors mix. Then apply another coat of aqua green. In the end, you will have multiple gradients of aqua green on the canvas!
If you want, you can again use some black paint to blunt out the edges. See how perfect the combination looks when you blend black on the edges. It is the galaxy that you dream of!
Step Six: Sprinkle On Some Stars!

This is the part where you give a complete look at your galaxy. The single most crucial component of the entire galaxy’s art is the stars. Without the stars, you can’t depict the illusion of milky ways!
So, take a toothbrush and some white acrylic or gouache. For this step, watercolor is often a bad idea. Because when you sprinkle the white watercolor on top of the dark colors, the white color fades out. So, it is better to use some thicker paint.
Put some white paint on your toothbrush. Maintain a perfect height above the canvas that is not too high or too low. Using your fingers, just rub off the bristles. Do it from a little high up so that you don’t end up with too many stars!
Now, slowly sprinkle over all the diagonal patterns and then over the black areas. Just like the Milky Way, a thousand stars are now visible in your galaxy. This step will completely change the entire look of your artwork.
You can use a brush to outline the spark of the stars. It is optional, though. It will look more aesthetic. Use a detailed liner or a fine brush here to draw the stars. Actually, drawing stars comes in handy when you mistakenly put a giant blob of white paint somewhere. You can keep the blob at the center and mark the outlines of a star.
Sometimes, some people don’t want to use white paint to mark the outlines of the stars. Instead, they use white pens to draw stars. It looks equally beautiful! And the outlines will come out more uniform if you are scared to do it with a brush. Actually, this is a plus point!
Step Eight: Add Planets And asteroids If You Want To
After step seven, if you want to keep your galaxy like this, it’s no biggie. But if you are going to draw more textures, then you can add this step at the end. You can buy different shapes of canvases. Or you can cut out different shapes like circles, triangles, squares for your galaxy frame.
Now, in the final step, mark out the outlines of planets and asteroids using a pencil. Use a different color for each planet. For example, Venus is a hot glowing body, so make it brighter and warmer. Mars is more orange. Saturn has rings around it, so don’t forget to make some spherical patterns around it.
In addition, you can put tiny asteroids in between. It might make the artwork look a bit more congested. So, stay within the limits. Do not overdo any step. You need to be very careful when using acrylic colors or gouache. Because if you make a mistake, unless you are an expert, it may be difficult to conceal.
Finally, your galaxy artwork is ready! Now, edit this as per your wishes. If you want to add aesthetic captions on top or motivational words, then go for it. Let your galaxy art dry out completely. In the end, you will be able to see the fruits of your hard work. You have now created an exquisitely beautiful galaxy!
Step Nine: Put A Layer Of Varnish
If you are framing your canvas or want to store it for long, it is essential to apply a coat of varnish on top. Sometimes, some people use a layer of resin. It also creates a durable protective coating.
If you have painted the galaxy with acrylics, it is best if you use acrylic varnish. You can buy these from any online store at the lowest prices. A varnish will help you to store the galaxy artwork for many light-years, as you wish!
What Is The Best Color Media For Galaxy Art?
Most people would tell you this: The best media for galaxy art is watercolor. Although, many people also prefer acrylics for their galaxy art. However, my personal favorite is only watercolors, due to several reasons.
To be fair, watercolors are mild, and they don’t dry out quickly. In fact, I would say that watercolors are pretty forgiving. Even if you put one stroke by mistake, you can either soak the color using tissue paper or blotting paper. Or, you can just wipe it away and blend it with other colors.
Watercolors are cheaper and easier to find. In any local store, you can easily find the best brands of watercolors. My favorite brand of watercolor is Reeves. And the favorite among the acrylics is Monte Mart. I think nothing beats the quality of Monte Mart paints. In fact, all beginners know this too.
On the other hand, acrylics are very unforgiving. So is gouache. They are thicker and dry out quickly. So, there is not much time left to rectify your mistakes. Once acrylics dry off, they leave a permanent stain there. Hence, acrylic is not a comfortable choice to work with when it’s about galaxy artworks.
Also, watercolors take time to dry. They are lightly pigmented. So, if you are using a sponge, take a big chunk of the paint on it. Otherwise, your patterns and textures will fade out in no time. So, this is where you might need acrylics.
Because acrylic colors, as we all know, are quite heavily pigmented. So, even if you put a stroke by mistake, it can be hard to edit it or just wipe it away with tissue paper. Nonetheless, if you dilute the acrylic, there is a faint chance that the pigmentation may reduce and allow you one or two rookie mistakes.
However, whether you want to use watercolor or acrylics, it is entirely your choice. In fact, I would suggest trying all the media first for yourself. Then, you will be able to differentiate and tell which media is the best for you. It may differ from person to person. Art is how you see nature and the world. So, what comes out doesn’t matter. Your efforts are what count!
Don’t Have Paint Brushes? Use These For Galaxy Art!
It is not mandatory that you need to have brushes of all sizes for your galaxy art. In fact, you can complete artwork with just the basic things available near to you.
For galaxy artworks, basically, a sponge is the best alternative to paintbrushes. Although, since childhood, you may have practiced using paintbrushes. So, you don’t need to worry much about it. Using a sponge helps you to take just the right amount of paint you need. There is no wastage and no additional requirements!
For the sponge, you can use the kitchen dishwasher sponges or the sofa sponges, whichever suits your artwork. The sofa sponges are softer and can hold larger quantities of colors. Their dabs are also perfect and fall perfectly in the areas instructed.
In the case of colors, you can use any color. It is entirely your wish. But always try to start with the very basic and premium colors. Because if you start with familiar colors, any mistake done can be withdrawn or edited.
In addition, if you do not have high GSM paper, use handmade paper. Nowadays, making paper on your own is not a big deal. There are videos on YouTube showing you different techniques to make handmade papers of different colors.
Color Blending: Dos And Don’ts

Most people didn’t go to art school to learn about artwork and different techniques. Think about Vincent Van Gogh! Did he go to art school? No, right? It is an inherent talent and a latent quality that comes on its own. If you have a thing for art, you definitely understand how this inherent thingy works!
However, you don’t need to be Vincent, or you don’t need to go to art school to learn the tricks of color blending. You can become a self-taught artist with at least three days of practice! Here, I would like to discuss the Dos and Don’ts of color blending, especially in the case of galaxy artworks. Read this part to know more!
Dos
For blending, the dos are pretty simple. All the steps that I explained constitute the Dos. That is, how you must mix the colors, use sponges for better outcomes, utilize the maximum out of minimum resources, etc.
Also, you can use masking tape at the borders of your frame so that the margins come out smoothly. During removal, you may feel that the tape is sticking to the paper so tightly that removal may cause tearing.
In such situations, take a blow dryer or a hairdryer and simply heat the masking tapes at low heat. Now, remove it slowly and gently. The paper won’t tear anymore!
And among the compulsory Dos, make sure that the paper is a hard and thicker one. The low GSM papers will tear out easily when you dab on them. Always wait after you apply the background coat. Wait after every diagonal you made to dry out completely. It is due to the fact that the paint should get enough time to dry out.
Don’ts
For the Don’ts, there are so many! First of all, do not overdo it! You don’t need to fill up the whole paper or canvas with as many shades of color as you know! The colors should be moderate in amount and shouldn’t look ugly to the eyes. Choose a combo that does not hurt the eyes.
Next, don’t use too much black to fill out the edges. Don’t put black in the center of the diagonal patterns. It will ruin your diagonal patterns and your hours of blending. Additionally, don’t use a shade of color that doesn’t really go with the combo. For instance, if you mixed brown or green with it in the above galaxy, it would have been absurd.
So, make sure the colors you choose do not look ugly on paper. Besides, if you do not have a sponge and you are using brushes, don’t use the giant sizes of brushes you own or not even flat brushes. Flat brushes or angled brushes can ruin galaxy art if it goes terribly wrong! So, I always prefer to use round brushes. The size can be from 8 to 10.
The last point I want to mention here is actually my personal opinion. From my experience, I have seen that watercolor and acrylic galaxies tend to dry out after a few days and lose their charm. It looks dirty and old.
So, preserve them. Don’t just throw it away. Use varnish, polish, resin, whatever you find suitable. These are all about the Dos and Don’ts of color blending in galaxy art.
Conclusion
Painting a galaxy seems very tough at the first attempt. But if you have a complete guide on how to paint a galaxy, it shouldn’t seem much trouble to you. Most beginners in art struggle with the color blending of galaxy art. It is only because of the lack of experience with blending and using a sponge.
So, practice more, and you can be a galaxy specialist yourself! I hope this article helped you to gain some perspective on the ins and outs of galaxy art. Thank you for reading the entire article with patience. Grab your colors and create a masterpiece today! Have a nice trip to the galaxy of your dreams!
If you are complete beginner you might want to check our article: Painting For Beginners: How To Get Started? It will give you better understanding about painting
To get inspired check this: Painting Ideas For Beginners: Here’s What To Paint


